
Your First Run
VolNinja is installed, and IBKR is connected (see Installing & starting VolNinja and Connecting IBKR if either still needs doing). This article is the orientation lap: a quick tour of the main screens, the header controls, and where to go first once you know your way around.
Nothing here places a trade. Read it end to end, then jump to Placing a trade when you are ready to act.
The Dashboard — your home base
The Dashboard opens first, and it is where you will spend most of your time. Here is the whole screen, top to bottom:
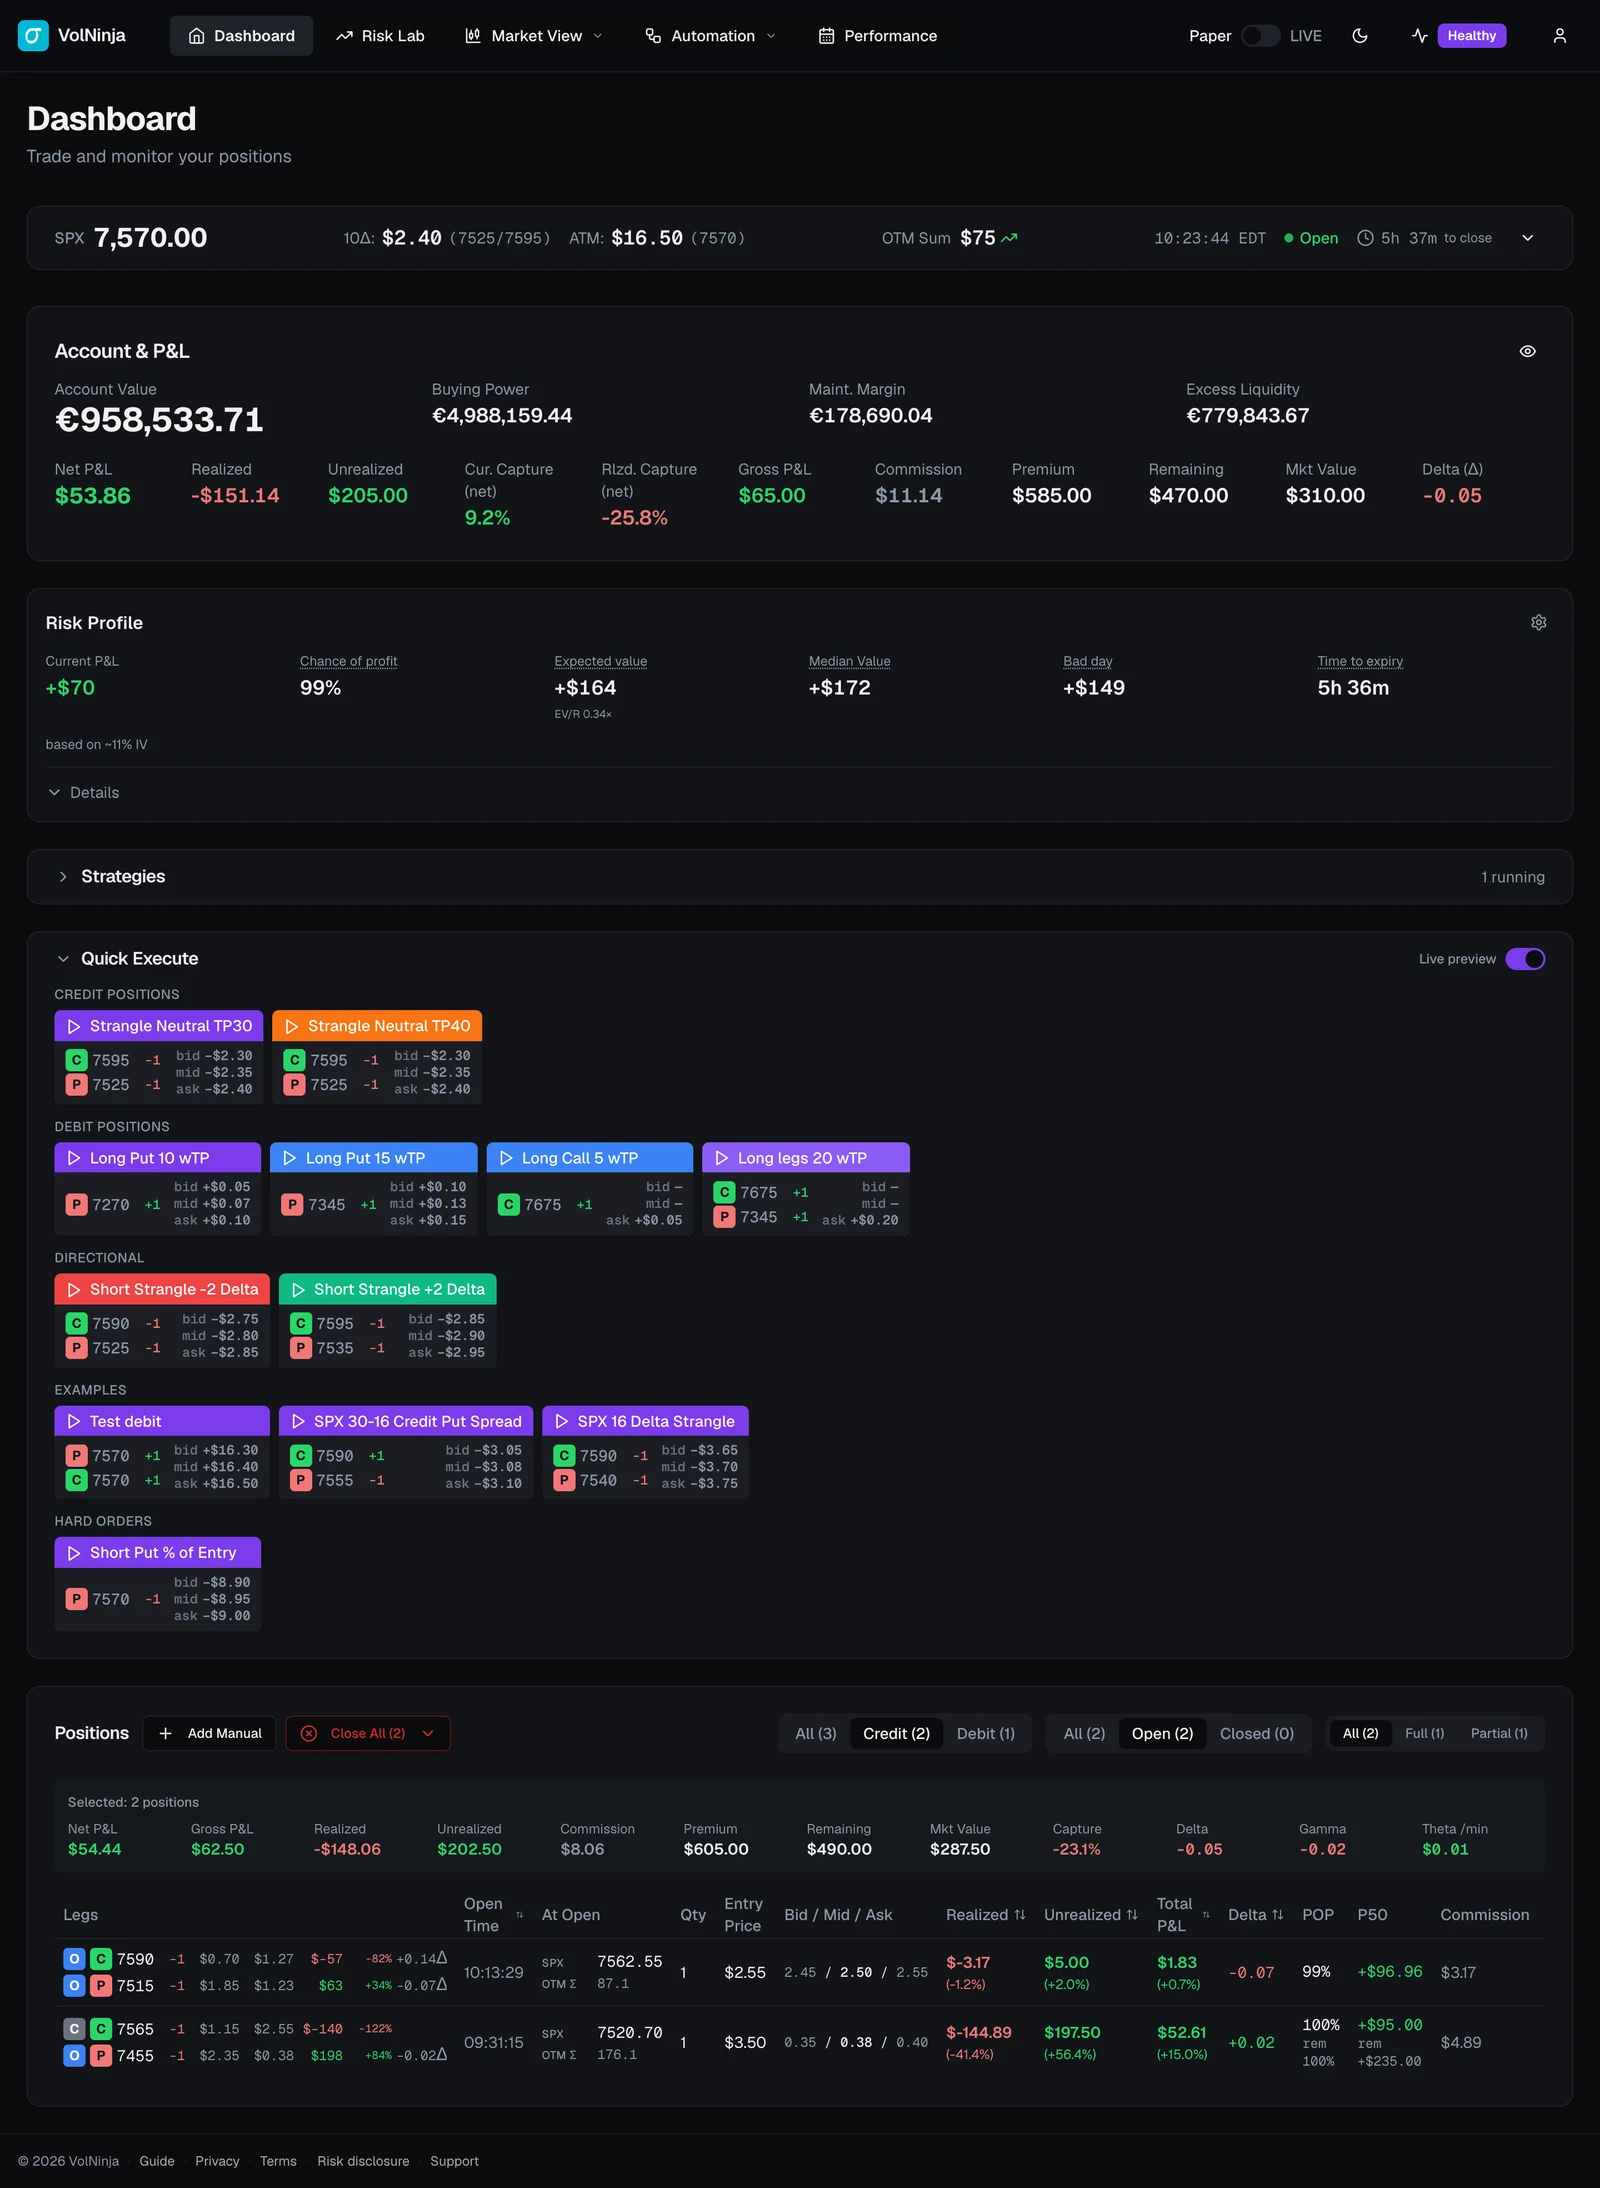
Now the same thing card by card.
Market context
Pinned under the navigation is a live market strip for SPX: the current price, the ±0.10-delta and at-the-money option prices (with the strikes they refer to), the day's OTM premium sum, the Eastern-time clock, and the market status (Pre-market, Open with a countdown to the close, or Closed). The chevron on the right unfolds an intraday chart without leaving the Dashboard.

Account & P&L
Account & P&L covers the state of your account and how today is going. Account value, buying power, maintenance margin, and excess liquidity sit on top; the day's running P&L (realized, unrealized, capture, commission, premium, market value, and net delta) below. Green is positive, red is negative, so you can read the whole row at a glance.

Tip
The eye icon in the corner hides every balance on this card, which is useful when you are sharing your screen or recording.
Risk Profile
Risk Profile is the one-glance read on your open book: your Chance of profit, the Expected value and Median Value of your positions, a Bad day figure, and the Time to expiry, with the implied volatility those numbers assume noted underneath. Expand Details for the full percentile ladder (P99 down to P1) and the return-on-risk behind them.
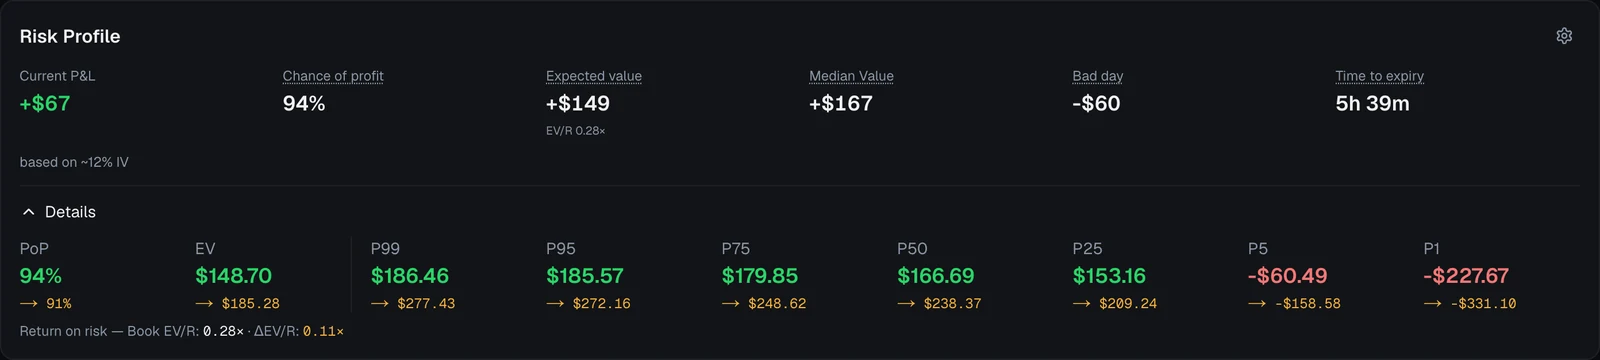
This is the same read you get in the Risk Lab (below), one glance shorter. The task version is Checking risk before you commit.
Strategies
The Strategies card lists any strategy running in your current trading mode, each with a switch to pause or resume it. A strategy is automation that opens and closes trades on its own; you meet them in full in Strategies overview.

Quick Execute
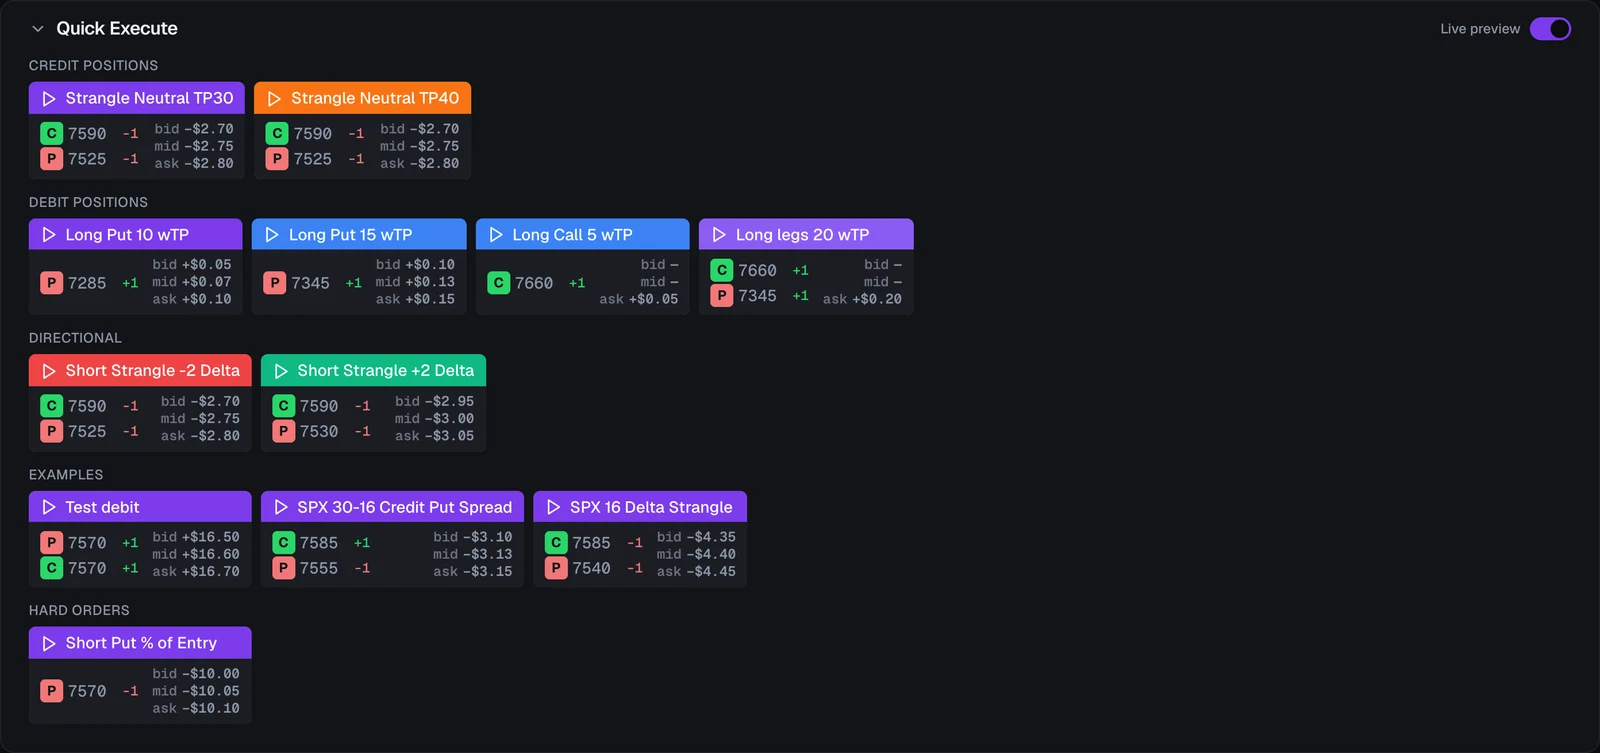
Quick Execute turns your favorite templates into one-tap buttons, grouped by category, each previewing its legs and live prices. Tapping one runs that template; the Live preview switch controls whether those prices keep updating. A template is a reusable trade blueprint. See Templates overview and, for the whole flow, Placing a trade.
Positions
At the bottom is the Positions list: every position you hold, updating live as the market moves. Three sets of tabs filter it: credit or debit, open or closed, and fully or partially closed; each tab carries its own count, and the strip above the rows totals only what is shown. Here it is narrowed to open credit positions. Click a column header to sort by it. Each row shows the position's legs, when it opened and at what SPX level, its live bid/mid/ask, realized and unrealized P&L, delta, and its probability figures; selecting one opens the full Position Details sheet.
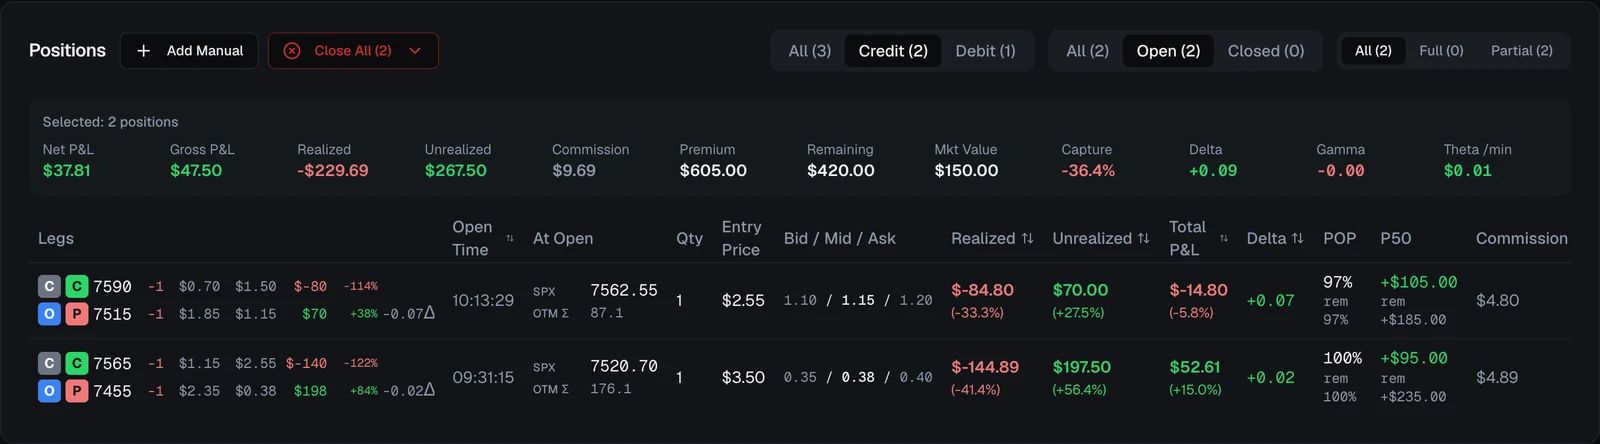
Two buttons sit in its header: Add Manual, for recording a position VolNinja did not open, and Close All, which closes everything currently shown, either with Close at Market or through Close with algo, which works the exit with one of your execution algos.
The full tour of this list (reading a position at a glance, filtering, sorting, and acting on it) is in Positions overview; Position details covers the per-position sheet.
The header
The bar across the top of every screen stays pinned as you scroll.

On the left, the VolNinja logo takes you back to the Dashboard, followed by the navigation: Dashboard, Risk Lab, Market View (Options Chain and Intraday), Automation (Templates and Strategies), and Performance. On a phone this collapses into a menu button, with a short tab bar at the bottom of the screen.
On the right are the Paper / LIVE trading-mode switch, the theme toggle, a health pill that opens System Status (your workers, IBKR connections, and market data), and the avatar menu holding Settings, Manage account, and Sign out.
Tip
Check two things before every session: the Paper / LIVE switch, so you know which account you are in, and System Status, so you know everything is connected.
Market View — reading the market
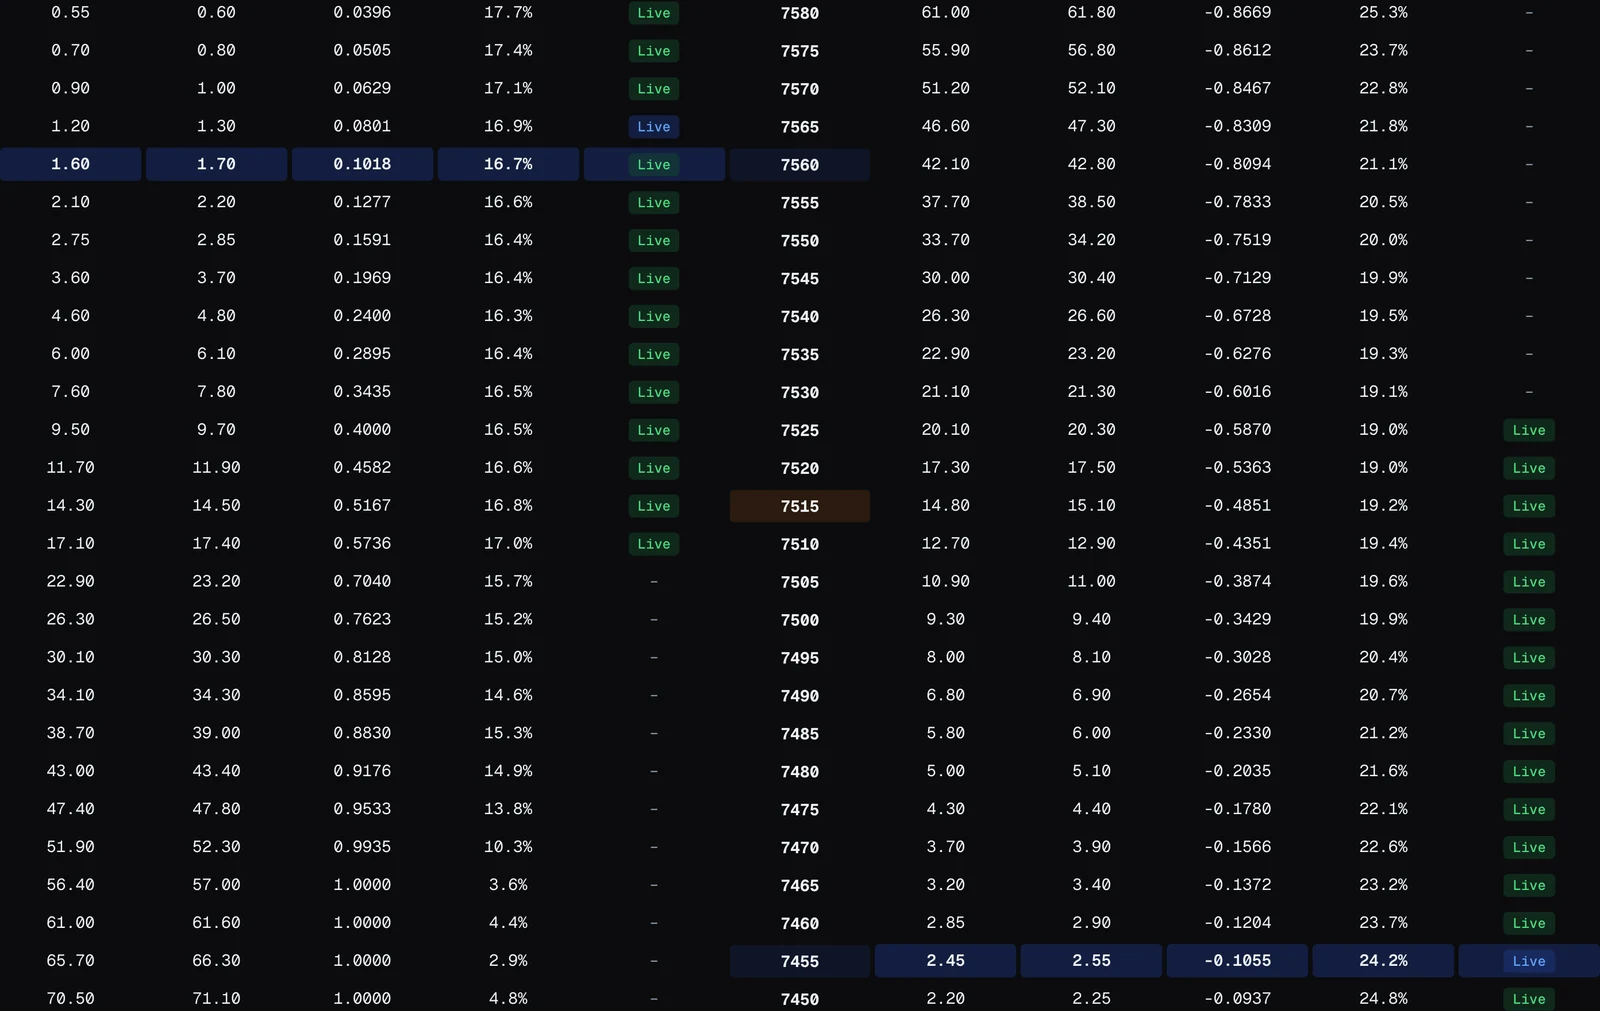
Market View → Options Chain is a live, read-only 0DTE quote grid: bids, asks, deltas, and implied volatility, with the at-the-money and ±0.10-delta strikes highlighted. A selector at the top right switches it between SPX, XSP, SPY, and QQQ. It is for reading the market: there is no per-strike button and no order entry here.
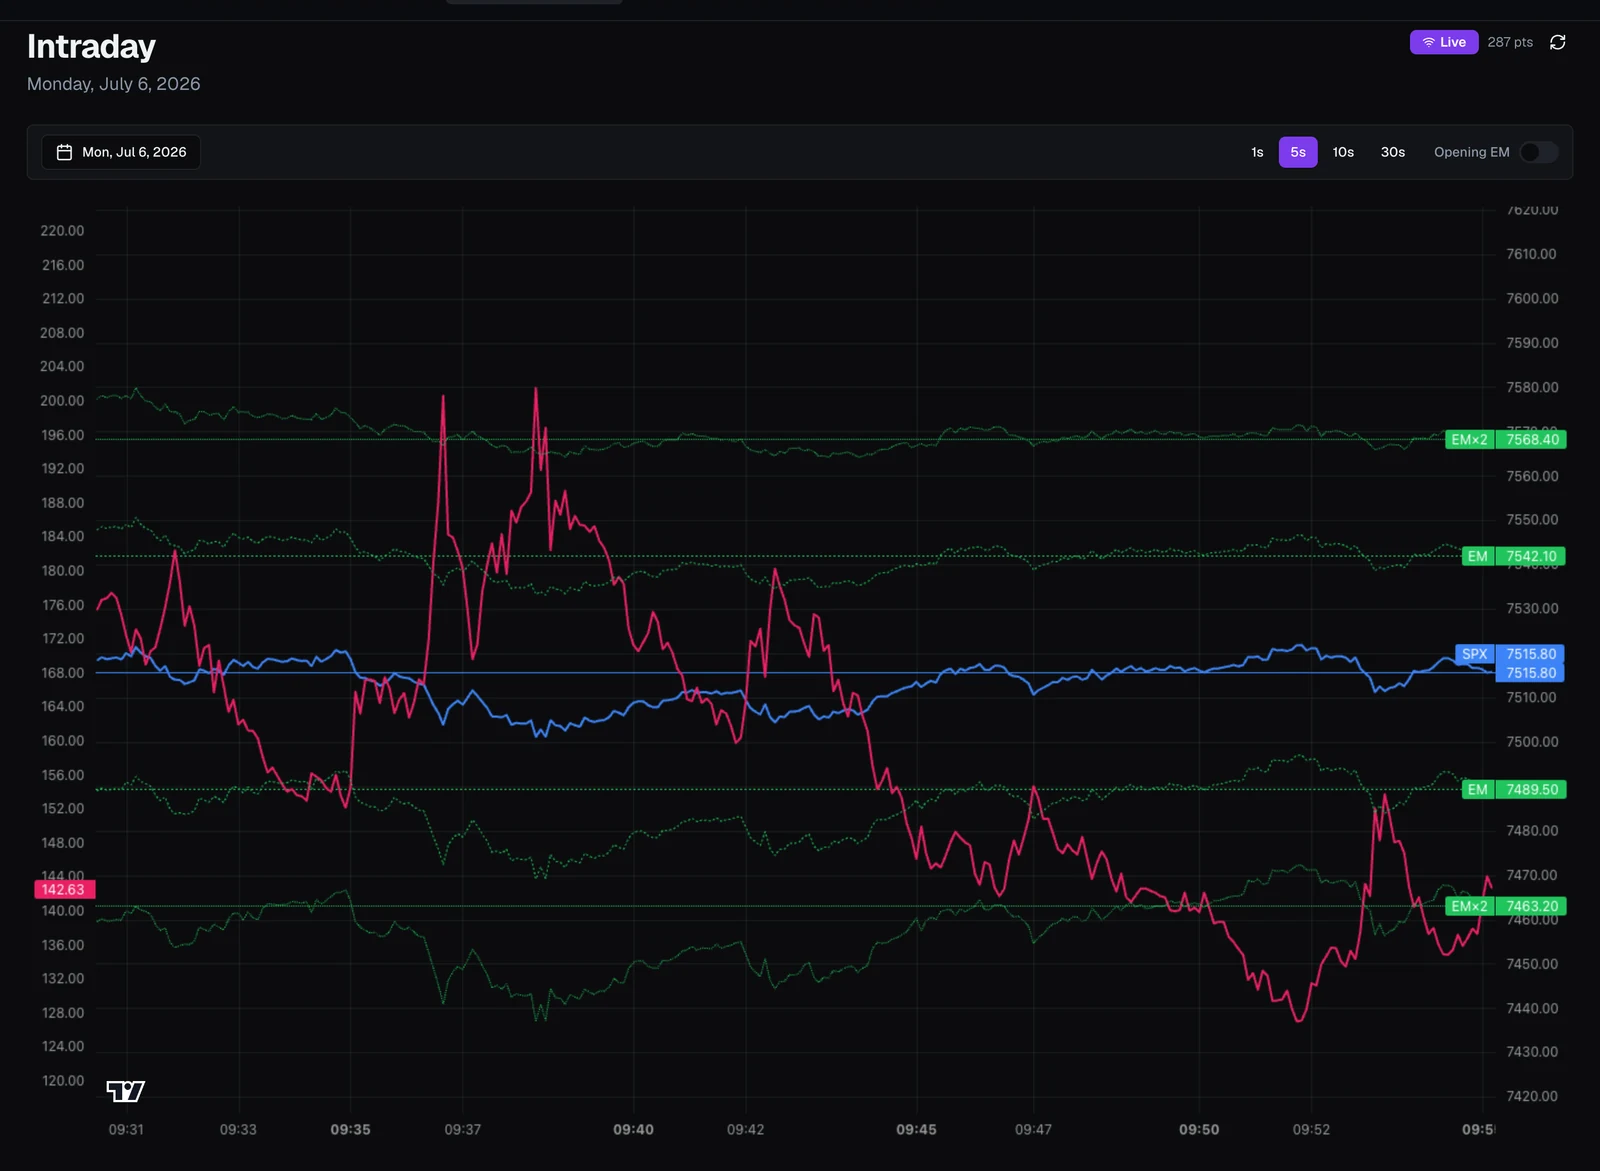
Market View → Intraday plots the day's price line for whichever underlying you pick, with its expected-move bands. Full detail lives in Options chain and Intraday.
Important
VolNinja streams live quotes within IBKR's 100-subscription limit. Your usage against that budget is shown in the System Status dropdown, beside a Data pill that tells you whether your quotes are keeping up. See Market data & subscriptions.
Automation — trading without watching
Two menu items under Automation are where VolNinja does work for you:
- A template is a reusable blueprint for a trade: its legs, how it enters, and the rules that manage it afterward. You saw your favorites on the Dashboard's Quick Execute card; you build and organize them at Templates overview.
- A strategy watches the market and opens or closes trades across your templates on its own, driven by conditions you set. Start at Strategies overview.
Both are built from the same building block, a rule with conditions and actions, explained once in Rules and conditions. You do not need any of this to place your first trade; it is what you graduate into.
Risk Lab — will this position hold up?
Risk Lab shows how likely a position is to work out, and what happens to it if the market moves. The same Risk Profile card from the Dashboard headlines it, this time over a P&L cone that fans your possible P&L out to expiry, a terminal-P&L distribution, and what-if sliders. You can load a real position or build a what-if scenario to see the effect before you commit.
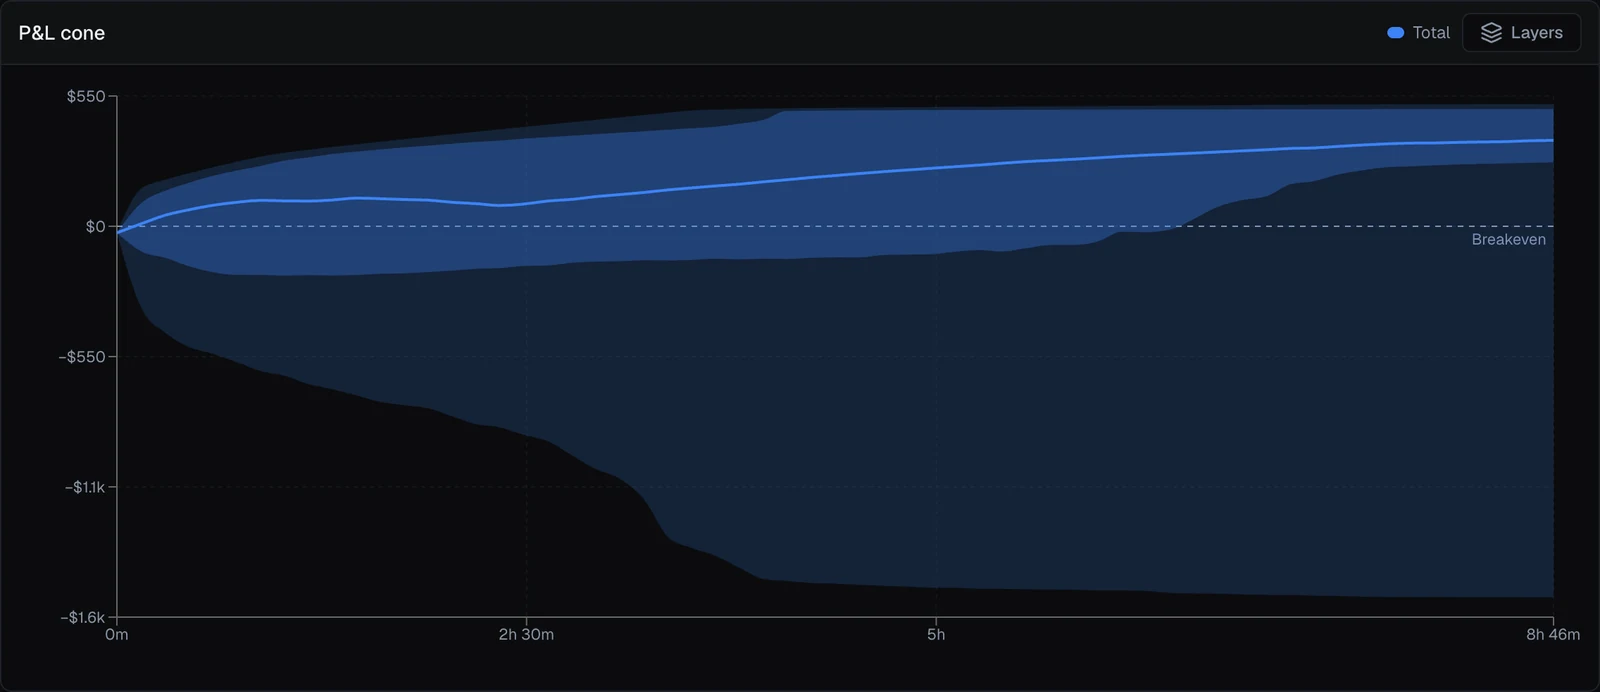
The full workbench (the risk profile, cones, the distribution, and the what-if sliders) is covered in Risk Lab. For the task-focused version, see Checking risk before you commit.
Performance — how it went
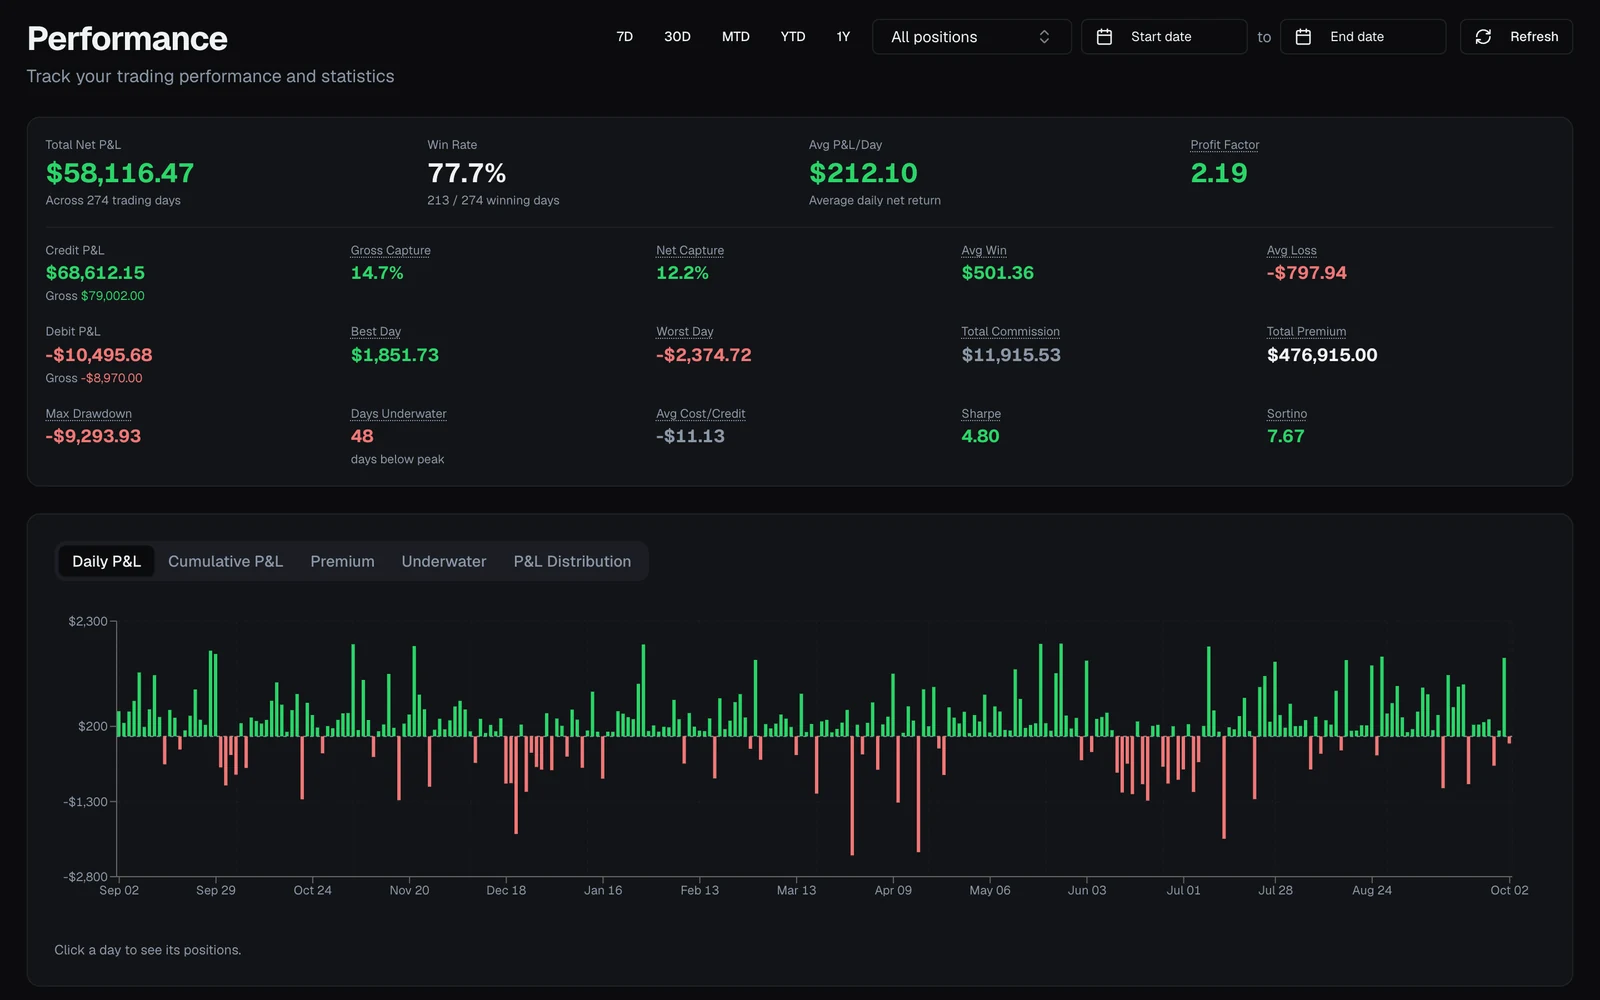
Performance is the review screen: pick a period (or narrow it by which strategy opened the trades) and read KPIs like net P&L, win rate, capture, and profit factor, with charts and a daily or monthly table. Click any day to see the positions you traded on it. See Reviewing your results.
Before you trade: check your mode
The Paper / LIVE switch in the header decides whether new positions open in your paper (simulated) account or your live account. Flipping it always asks you to confirm, and live mode carries a red REAL MONEY badge so there is no mistaking it.
Warning
Every close or roll places a real order when you are in live mode. Confirm the switch reads Paper while you are learning, and never submit test orders while you are in live mode. The full safety habit is in Paper vs live — trading safely.
Settings, and what it configures
Open Settings from the avatar menu. It is organized into six sections: Connections, Market data (which strikes VolNinja watches within your subscription budget), Trading (including how often your rules are checked), Execution algos (your saved ways of working an order into the market), Simulation, and Preferences. Your trading mode is not set here; it lives in the header switch. See Settings.
What to do first
The natural first thread is to get a trade onto your Dashboard and learn to protect it:
- Placing a trade — the three ways a trade reaches your Dashboard.
- Building a template — turn a trade you like into a reusable blueprint.
- Automating exits & management — have VolNinja manage or close a position for you.
- Checking risk before you commit and Reviewing your results — judge a trade beforehand, and learn from it after.
If anything looks wrong (a screen won't connect, quotes look stale), start at Troubleshooting & FAQ.